Creating an environment of worship that resonates both spiritually and acoustically requires a well-thought-out sound system. A church’s audio setup is much more than just a collection of microphones, speakers, and mixers; it’s an instrumental part of creating a captivating and enriching worship experience.
A sound system that is tailored to a church’s unique architectural and congregational needs can enhance the clarity and impact of the spoken word, musical renditions, and other facets of the service. In this post, I’ll explain how to setup a church sound system, making it an accessible venture regardless of your technical expertise.
How to Setup a Church Sound System
1. Choose a location for the sound booth
Think of the sound booth as the command center of your church’s audio. It’s vital to pick a spot where the sound engineer won’t be disturbed and can focus on their job. The chosen location should give the engineer a clear view of both the stage (or altar) and the congregation.
This allows the engineer to gauge how the sound feels to those in attendance and make necessary adjustments. In essence, find a quiet spot where the engineer can see everything and isn’t tucked away in a corner.
2. Set up the mixing console
The mixing console is like the brain of your sound system. This is where the magic happens! The sound engineer will use this board to balance the sound levels from different sources, making sure everything is heard clearly.
Whether it’s the pastor’s sermon, the choir’s hymn, or a musical instrument, the mixing console ensures that everything sounds just right. When setting it up, ensure it’s within easy reach of the engineer and that all its parts are accessible.
3. Connect the microphones
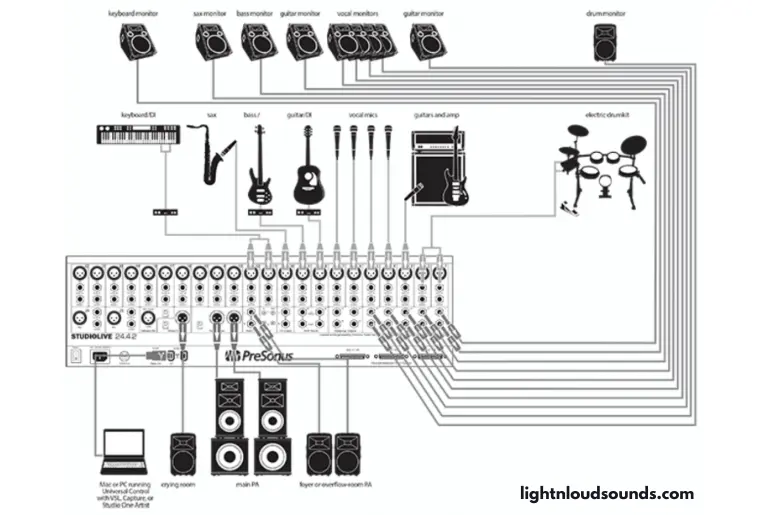
Microphones are your ears in the church; they pick up the sounds you want to amplify. These sounds could come from people speaking, singing, or playing instruments. Each microphone has a cable that needs to be plugged into the mixing console.
It’s a simple connection: one end of the cable goes into the microphone, and the other end goes into the console. Once connected, the sound engineer can adjust how loud or soft each microphone sounds through the speakers.
4. Hook up the amplifiers
Once the sound is mixed and balanced on the console, it needs a boost to reach everyone in the church. That’s where amplifiers come in. They take the sound from the mixing console and give it the volume and power it needs to drive the speakers. Connect a cable from the mixing console’s output to the amplifiers to set them up. After this, the amplifiers will send this powered-up sound to the speakers, ensuring everyone can hear what’s happening up front.
5. Connecting the speakers to the amplifiers
Amplifiers are essential gadgets as they boost the audio signal, making it strong enough to move the speakers and create sound. It’s relatively straightforward; you’ll use speaker cables to connect the two. Usually, the cables plug into marked ports on the back of the amplifier and on the speakers – just make sure you match them to the correct ports.
6. Place the speakers around the room
Now that your speakers are connected, it’s time to place them around the room strategically. The positioning of the speakers greatly influences the quality of sound. Ideally, the main speakers should be positioned high up at the front of the room; this helps to distribute the sound evenly across the congregation.
On the other hand, monitor speakers should be placed on the stage facing the musicians. These monitor speakers allow the musicians and choir to hear themselves clearly. Take your time with this step, as the right placement can significantly enhance the auditory experience of your services.
7. Test the system
With the speakers and amplifiers set up, it’s now time to test the system. Turn on the amplifiers and play some audio through the system. It’s advisable to start at a lower volume, then gradually increase to the desired level to avoid any sudden loud bursts of sound. Listen to the sound from different parts of the room to ensure it’s clear and evenly distributed.
You might need to adjust the levels of different inputs on the mixing console to balance the sound to your liking. Adjusting might take some time, and it’s often a matter of trial and error to get it right. It’s also a good idea to have someone with a discerning ear to give feedback as you make adjustments.
Conclusion
In the sanctuary of a church, the sound system acts as an unseen bridge, connecting the pulpit to the pews and ensuring that every word, note, and emotion is clearly conveyed. By understanding the components, acoustics, and specific needs of a congregation, one can design a sound setup that truly amplifies the essence of worship. Let this guide serve as a foundation for creating an auditory experience that touches the soul and fosters spiritual growth for all who gather in devotion.